Configuration
In the "Create Bot" page, the configuration section requires you to enter the necessary configuration options to create your bot. This always includes the bot's name, and for some platforms, such as Telegram, a "key" input may also be required. This documentation guides you through the process of entering the required configuration for each platform.
Telegram
To create a Telegram bot using Bot Studio, first go to the create bot page, select Telegram as the platform for your bot, and follow the below steps:
- In the configuration form, enter a name for your bot. The name should be between 1 and 20 characters long.
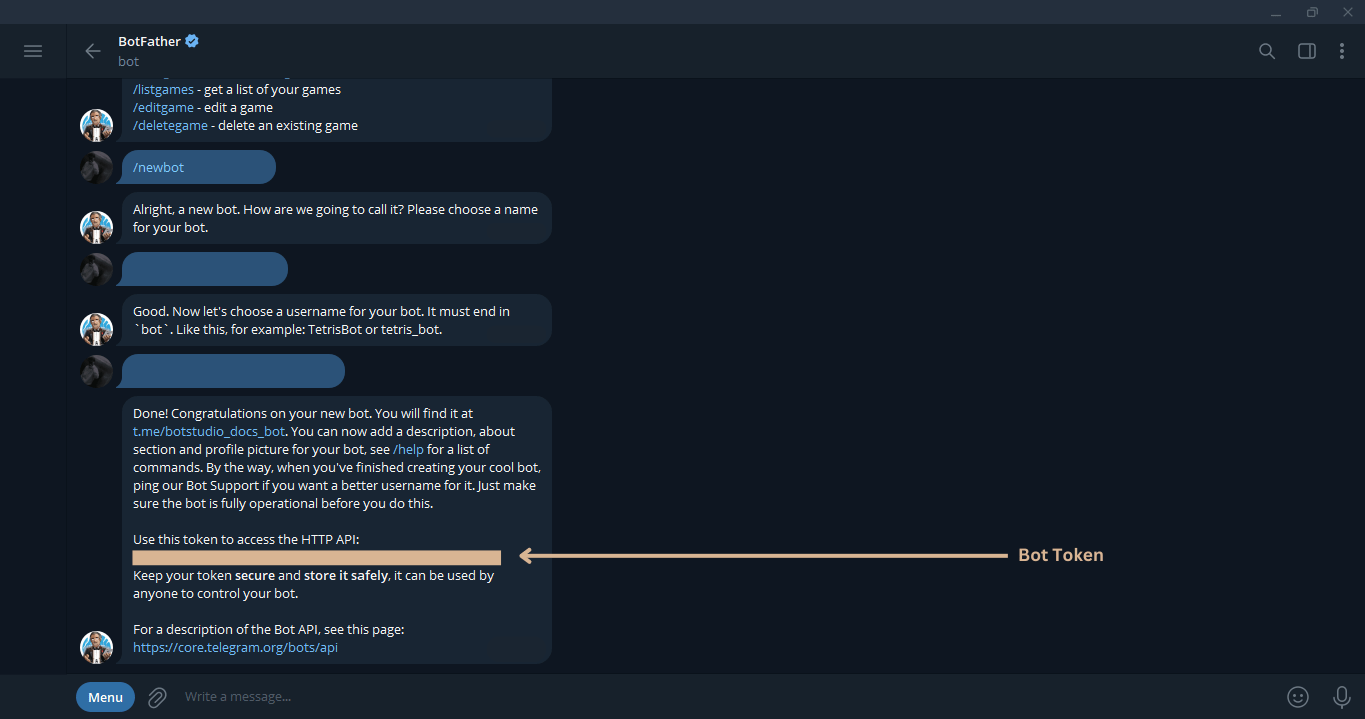
- Enter the token you've received from Telegram's @BotFather.
To get a @BotFather token, follow these steps:
- Open the Telegram app and start a conversation with the @BotFather bot.
- Send the
/newbotcommand and follow the instructions to create a new Telegram bot. - After creating the bot, @BotFather will send you a message with your bot token. Use this token in Bot Studio's configuration as the key for your bot.

After this, you can go to the editor page and modify your bot's functionality. You can send a message to your bot to see how it works.
If you are using this bot for test servers, make sure the bot has administrator permissions and can read all events and perform all tasks.
Discord
To create a Discord bot using Bot Studio, first go to the create bot page, select Discord as the platform for your bot, and follow the below steps:
- In the configuration form, enter a name for your bot. The name should be between 1 and 20 characters long.
- Enter the token you've received from the Discord Developer Portal.
To get a token from the Discord Developer Portal, follow these steps:
- Go to the Discord Developer Portal.
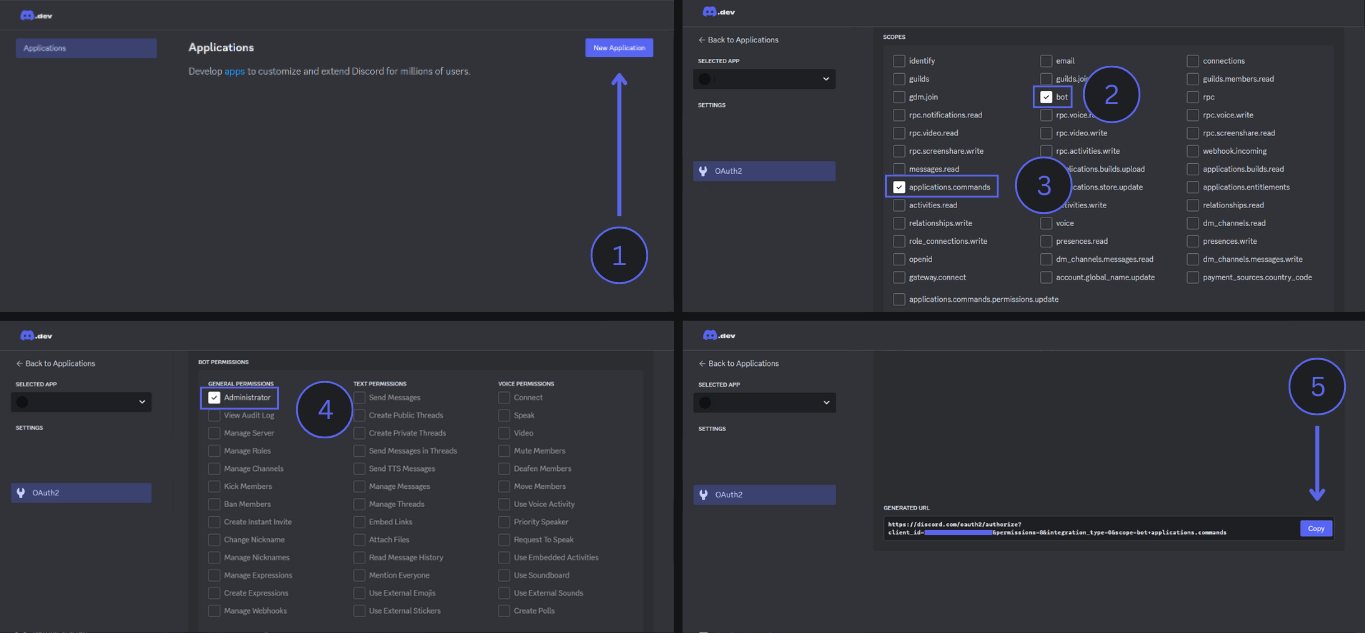
- Click on the
New Applicationbutton, enter a name for your application, agree to the terms of service and developer policy, then click on theCreatebutton. - On the left side, click on the
OAuth2option and scroll down to theOAuth2 URL Generatorsection. - In the
SCOPESsection, selectbotandapplications.commands. Thebotscope identifies this application as a bot, and theapplications.commandsscope allows the bot to use application commands (only if needed). - In the
BOT PERMISSIONSsection, select theAdministratorpermission. Only do this for test servers, as this permission grants all permissions to the bot. - Scroll down and copy the
GENERATED URLlink address. Open this link in a browser and add the bot to a test server.

- Return to the Discord Developer Portal, select your application, and click on the
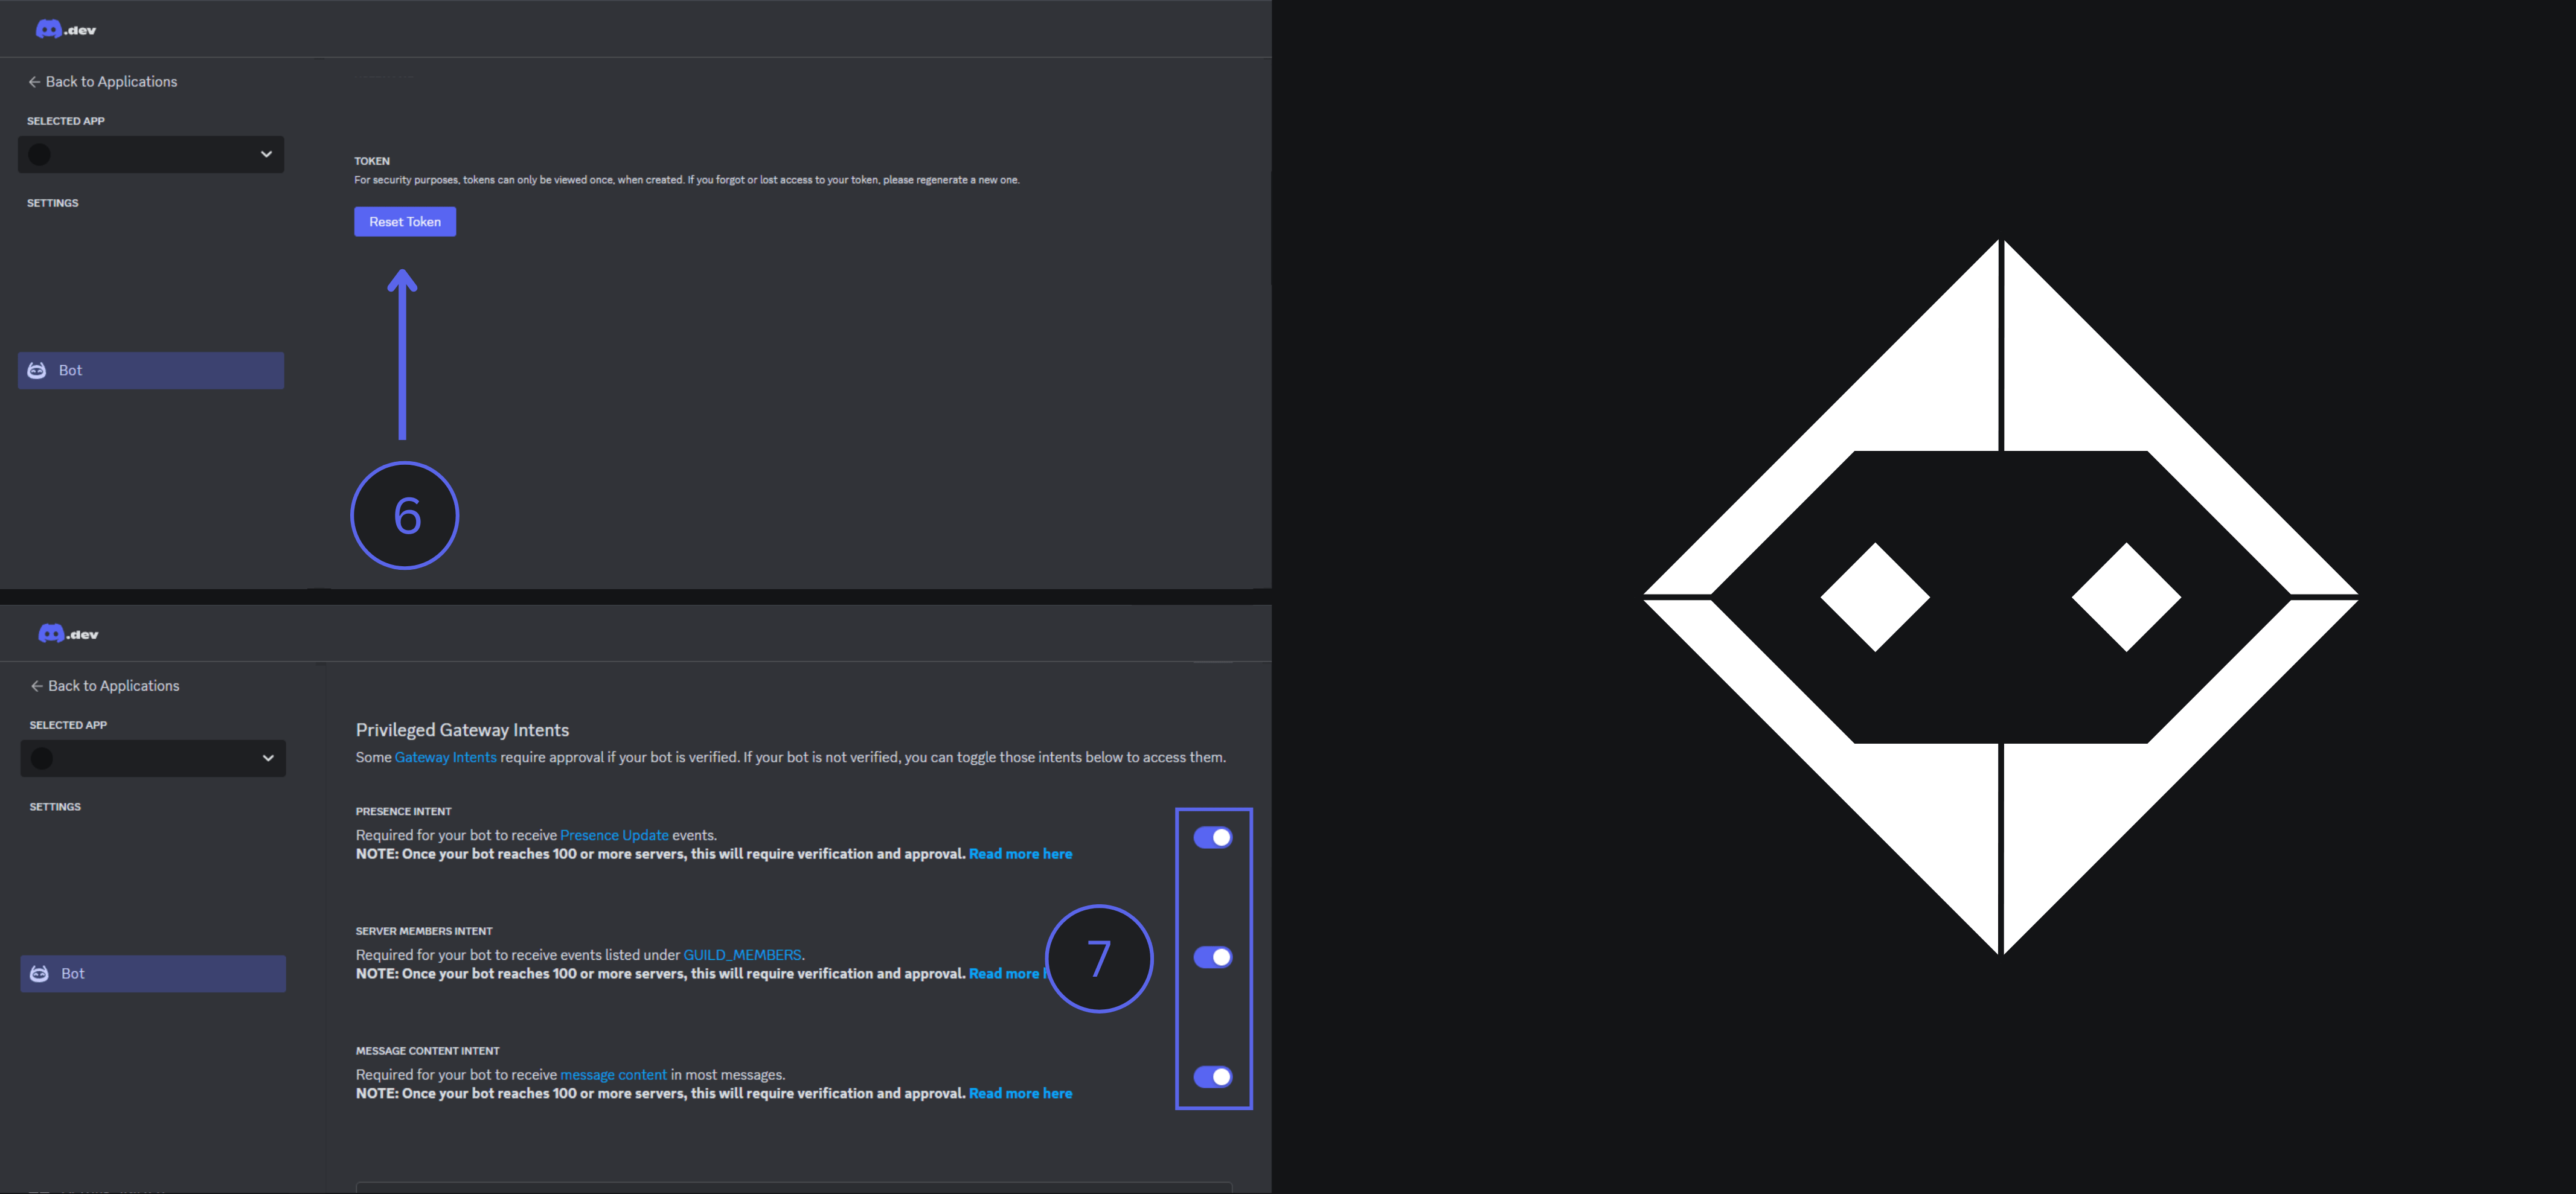
Botoption on the left. - Click on the
Reset Tokenbutton to generate a new token. Use this token in Bot Studio's configuration as the key for your bot. - Under the
Botsection, enable thePrivileged Gateway IntentsforPresence Intent,Server Members Intent, andMessage Content Intentif this is a test bot.

If you are using this bot for test servers, make sure the bot has administrator permissions and can read all events and perform all tasks.
To create a WhatsApp bot using Bot Studio, first go to the create bot page, select WhatsApp as the platform for your bot, and follow the below steps:
- In the configuration form, enter a name for your bot. The name should be between 1 and 20 characters long.
- Enter the key you've received from the WhatsApp QR Code Page.
To validate the key, scan the QR code. Click here for instructions on scanning a WhatsApp QR code.
Remember that you have to scan this QR code within 30 seconds after it has been created. Otherwise, you have to create another QR code by refreshing the page.
After scanning the QR code, the bot will run on your WhatsApp account, but it won't be activated until you fully create the bot in Bot Studio.
Slack
To create a Slack bot using Bot Studio, first go to the create bot page, select Slack as the platform for your bot, and follow the below steps:
- In the configuration form, enter a name for your bot. The name should be between 1 and 20 characters long.
- Enter the token you've received from Slack Applications.
To get a token from Slack Applications, follow these steps:
- Go to Slack Applications.
- Click on the
Create New Appbutton. - Select the
From an app manifestoption. - Choose a workspace to develop your app in and click on the
Nextbutton. - Enter the following JSON data as the manifest for your app:
{
  "display_information": {
    "name": "Bot Studio",
    "description": "www.botstudioo.com",
    "long_description": "This robot was crafted using Bot Studio's no-code robot maker, available at www.botstudioo.com. The details provided serve as an illustration of Bot Studio's capabilities within Slack, and they can be tailored to suit your specific requirements."
  },
  "features": {
    "app_home": {
      "home_tab_enabled": true,
      "messages_tab_enabled": true
    },
    "bot_user": {
      "display_name": "Bot Studio"
    }
  },
  "oauth_config": {
    "scopes": {
      "bot": [
        "app_mentions:read",
        "im:history",
        "bookmarks:read",
        "bookmarks:write",
        "calls:read",
        "calls:write",
        "canvases:read",
        "canvases:write",
        "channels:history",
        "channels:join",
        "channels:manage",
        "channels:read",
        "channels:write.invites",
        "channels:write.topic",
        "chat:write",
        "chat:write.customize",
        "chat:write.public",
        "commands",
        "conversations.connect:manage",
        "conversations.connect:read",
        "conversations.connect:write",
        "dnd:read",
        "emoji:read",
        "files:read",
        "files:write",
        "groups:history",
        "groups:read",
        "groups:write",
        "groups:write.invites",
        "groups:write.topic",
        "im:read",
        "im:write",
        "im:write.topic",
        "incoming-webhook",
        "links.embed:write",
        "links:read",
        "links:write",
        "metadata.message:read",
        "mpim:history",
        "mpim:read",
        "mpim:write",
        "mpim:write.topic",
        "pins:read",
        "pins:write",
        "reactions:read",
        "reactions:write",
        "reminders:read",
        "reminders:write",
        "remote_files:read",
        "remote_files:share",
        "remote_files:write",
        "team.billing:read",
        "team.preferences:read",
        "team:read",
        "usergroups:read",
        "usergroups:write",
        "users.profile:read",
        "users:read",
        "users:read.email",
        "users:write",
        "workflow.steps:execute"
      ]
    }
  },
  "settings": {
    "event_subscriptions": {
      "request_url": "https://slack.botstudioo.com/webhook",
      "bot_events": [
        "app_mention",
        "message.channels",
        "message.groups",
        "message.im",
        "message.mpim"
      ]
    }
  }
}
This manifest grants all permissions to your Slack bot. You can develop your bot first and then remove any unnecessary bot scopes later. Also remember that this file only listens for message events. The rest of the events are not working until you activate them.
- Click on the
Nextbutton after entering the custom manifest. - Review the summary and make sure everything is correct. Then click on
Createto create your application. - After your application is created, you'll be redirected to your app page. Click on the
Install to Workspacebutton to install the app. - In the
Featuresgroup, click onOAuth & Permissions. - Scroll to the
OAuth Tokens for Your Workspacesection. - Copy the
Bot User OAuth Tokenand paste it as the "Slack Application Token" in Bot Studio to create your bot.
Setting the Webhook Address for Your Slack Bot
- Return to Bot Studio's dashboard page and click on your bot from the "Robots" submenu.
- Copy the "webhook address" value, which looks like this:
https://slack.botstudioo.com/webhook/xxxxxxxxxxxxxxxxxxxxxxxxxxxxxxxxxxxxxxxx. - Go back to your Slack application, and in the
Featuresgroup, click onEvent Subscriptions. - Paste the webhook URL address you copied from the bot's dashboard.
- Once the URL is verified, click on the
Save Changesbutton.
Setting the Signature for Your Slack Bot
- In the
Settingsgroup, click onBasic Information. - Scroll down to the
App Credentialssection. - Copy the
Signing Secretvalue. - Return to Bot Studio's dashboard page and click on your bot from the "Robots" submenu.
- Click on the
Optionsbutton at the top of your robot's page and select the "Change Signature" option. - Paste the signing secret into the input field and click on the "Ok" button.
Enabling Slash Commands and Sending Direct Messages to Your Slack Bot
If you want to allow users to send slash commands and direct messages to your bot, follow these optional steps:
- In the
Featuresgroup, click onApp Home. - Scroll down to the
Show Tabssection and ensure the "Allow users to send Slash commands and messages from the messages tab" option is checked.
Managing Event Subscriptions for Your Slack Bot
To receive events from Slack and handle them using Bot Studio, you need to subscribe your bot to specific events:
- Navigate to the
Event Subscriptionspage under theFeaturestab in your Slack application. - Scroll down to the
Subscribe to bot eventssection. - Add custom event listeners such as
app_mention,message.channels,message.groups,message.im,message.mpim, etc., depending on your bot's functionality.
Managing Your Slack Bot Permissions
Each Slack token has access to specific permissions. Manage these permissions as needed:
- Navigate to the
OAuth & Permissionspage under theFeaturestab in your Slack application. - Scroll down to the
Scopessection where you can customize the permissions your bot requires.
Web Automation
To create a Web Automation bot using Bot Studio, first go to the create bot page, select "Web Automation" as the platform for your bot, and follow the below steps:
In the configuration form, enter a name for your bot. The name should be between 1 and 20 characters long.
Core
To create an Core bot using Bot Studio, first go to the create bot page, select Core as the platform for your bot, and follow the below steps:
In the configuration form, enter a name for your bot. The name should be between 1 and 20 characters long.
This concludes the documentation for creating bots on different platforms. If you encounter any issues or have further questions about creating bots, contact us for assistance.